Step 1: Decide on a computer program you will use. I used Publisher, but you could easily use PowerPoint (just go to Themes, Slide Size, and customize your layout- I use PowerPoint for literally everything) or another more advanced option like InDesign.
Step 2: Decide what you need. The best part of making your own is that you can include things specific to you! Look at friends planners and planners online to get ideas. Options include a budget section, meal planning, workout plans, school assignment sections, tabs for your family members, lesson plans, etc.
I included these sections:
A general calendar (one at year at a glance and one with each month broken down)
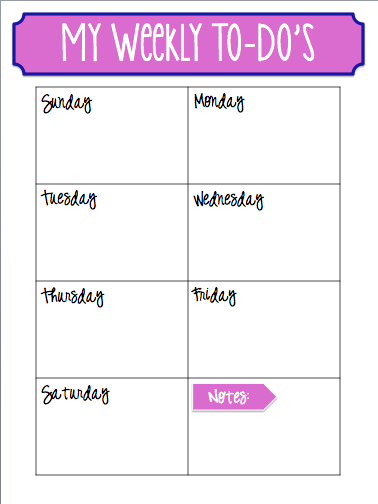
A weekly to-do (6 days and 1 note box)
An assignment spread
You want this to have everything you need, but without it being too bulky. Pick and choose what you need and think about how long each section should be. (For instance, I made the weekly to-do's and assignment sections the exact amount of pages I would need for 2 semesters.)
Step 3: Choose a font and color scheme. Consistency is key to making this planner look professional. I choose 2 fonts and stuck with them. One was for the headings and one for everything else.
Step 4: Start creating your pages! For the calendar section you can create your own, use a template, or buy a PDF calendar from Etsy (I chose to do this). This store has cute options! I made most of my sections by creating tables inside Publisher. I did tables because it ensured that every box was the exact same size.
 |
| Start with a blank document and add a table with however many boxes you want. |
 |
| Under table layout, choose a blank table style (with no background) |
Add text boxes for each day of the week. I added a notes section and created a cute arrow to go behind the word "note" to make it stand out.
 |
| You can download a PDF of this at the end of the post! |
 |
| This is how I inserted the arrow. Go to format object to change the color! |
 |
| This is how I inserted the heading plaque. I then changed the color and border by selecting format object. Then, I added the heading! |
Step 5: This is the fun part, time to add the extras! Make this personal and make it yours. Create a cute eye-catching cover and play around with your headings to make them pop! Here are some extras I added to my planner:
Dividers between each section (that coordinated with my theme)
A pencil pouch at the front
A post-it holder
Inspirational quotes at the bottom of each page
I have "It always seems impossible until it's done" Nelson Madela
Step 6: Print and publish! Once I printed out all of my pages, I took it to Office Max. I had them laminate (the thickest they have) and bind it all together. They even put the spiral through my pencil pouches!
Step 7: Show off your new masterpiece!
Here is a PDF of my weekly To-Do, happy planning!


This is such a cool idea! I love the idea of a personalized planner, but I actually love my school issued one so I just use it because that's the cheapest option for me. I don't know what I'll do when I get to college though, I'll have to either make my own like you did or just be lazy and buy one. I still have three more years to decide though.
ReplyDeleteRunning Alyssa
Thanks Alyssa! That is awesome that your school one works well for you! Mine just didn't have enough space for me to write!
DeleteSo glad you like it :) they add a fun twist to all casual and easy outfits !
ReplyDeleteLove this Planner , I love everything personalized !
http://morethanicanshoe.blogspot.com/
This is such a great idea! I absolutely love your planner! I've been using the Lilly planners for years, but maybe next year I'll make my own!
ReplyDeleteXoxo, Katelyn // asprinkleofkate.blogspot.com
This is absolutely adorable! I'm a huge Erin Condren fan, but this is a great alternative for sure :)
ReplyDeletexoxo, SS
The Southern Stylista